
First steps with a new operating system can be challenging, but once you’ve started feeling comfortable you’ll want to get back to using the computer for your everyday tasks. Often that will mean surfing the web, reading and writing emails, creating office documents and launching the occasional game. For some of those tasks you’ll need access to the files you’ve created with Windows programs, for other tasks you won’t. We’ll show you what to do about those Windows disks – and we’ll also discuss macOS-formatted media.
Working with a file that you’ve created on a Windows or macOS machine will often be as easy as simply clicking on it in the file manager window (Dolphin). If you’ve mastered the transition from double-click to single-click (the behavior that KDE defaults to), you’re ready to go.
In many cases you will want to work with your old Microsoft Office files: Word, Excel, and PowerPoint documents will open in LibreOffice. Sometimes you will first need to install an application that is able to read your file – check the AlternativeTo website or google your file’s extension combined with “Linux” to find such programs. In rare cases, no compatible Linux application exists. Then you have three choices:
- Assuming you still have Windows installed on your current or an old computer, boot that installation and use the original Windows application to work on your file.
- When booting back and forth is not an option, try virtualization (running a full Windows installation in a virtual machine, for example with VirtualBox, see page 47).
- Your third option is to run the Windows application on Linux with the help of a package called Wine. It is sometimes called a Windows emulator even though the name “Wine” is an acronym that expands to “Wine is not an emulator”. See an older Linux Magazine tutorial for a full introduction.
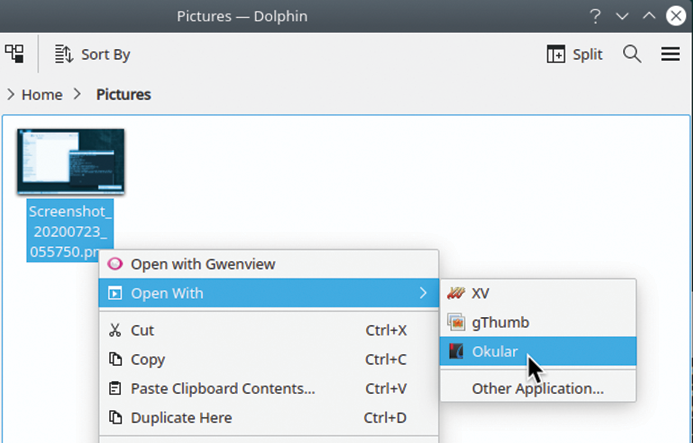
Note that many kinds of files can be opened with several Linux programs, and for each file type one of those programs is configured to be the default app. When you simply (left-) click on a document icon in the file manager, this default app will start and open the document (or create a fresh window or tab with that document, if it was already up and running). Right-click on an icon and select the Open With entry in the context menu to see a list of alternative programs (Figure 1).
Where’s My “C:” Drive?
One of the most common scenarios is a parallel installation of Windows and Linux on the same machine where the two systems share a common hard disk. If you’ve set up your machine in this way you may wonder: Where is the C drive that holds all your data?
Linux does not use drive letters like Windows does (C:, D:, and so on). Instead various volumes can be “mounted”: When Linux mounts a volume (which could be a local partition, a DVD, a USB stick or even some network resource), it will pick an empty directory in the current filesystem tree and add the volume contents inside and below this directory.
By default openSUSE does not mount your Windows media. When you open the Dolphin file manager, you will see a Devices section in the left pane, and there your Windows partition will show up with its volume label (name) if it has one or as X GiB Hard Drive if it has no name.
Click on the entry to access it – you will need to enter the root password (which is your own password if you have not explicitly set a different one for the administrator) in order to gain access.
After mounting the Windows partition you can search for your files: Windows and Linux organize private user files in a similar way, in both cases you will find them in the home directory. On Linux that is /home/username, and on Windows it is C:\Users\username which becomes the Users/username sub-directory of wherever Linux has placed the Windows partition in the global filesystem tree – it will be a long path such as /run/media/user1/1234ABCD5678FEDC/Users/user2/ with both your Linux username (user1) and your Windows username (user2) appearing inside.
This all works out of the box because Windows will always format its partitions with the NTFS filesystem, and openSUSE fully supports NTFS, that is, it can read and write files on NTFS-formatted media. The same is not necessarily true for other media you may use.
Other Windows Media
In addition to the partition that holds your Windows installation you may have other media also created by (or for) Windows. Perhaps you have stored data on an external hard disk, a USB stick, or an SD card and want to access them from your Linux machine. How hard can it be? It actually depends. Windows will format your media in either NTFS, ExFAT, or one of the older FAT filesystems: the latter ones have been around since MS-DOS was created in the Eighties. FAT has some important limitations when compared to NTFS:
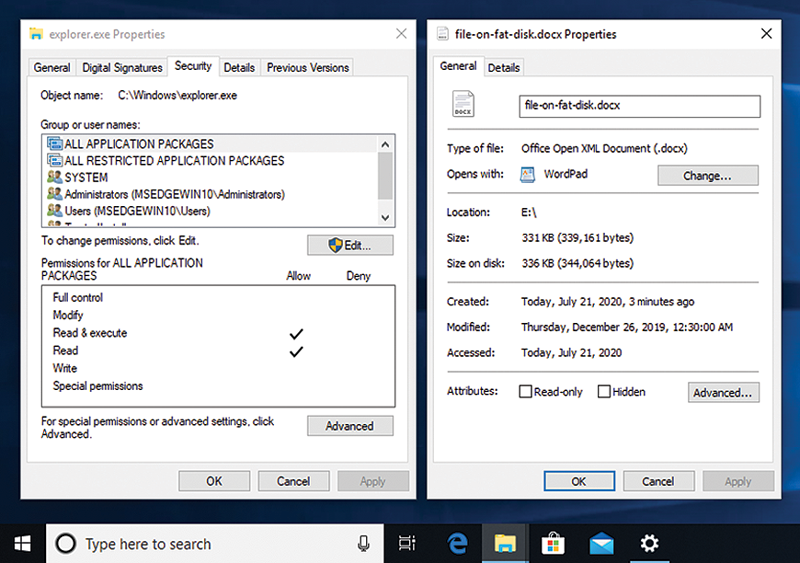
- FAT cannot store advanced file attributes such as ownership or access rights (Figure 2). Windows uses access control lists (ACLs) to handle this kind of information, and the FAT filesystem was designed for the single-user operating system MS-DOS.
- The maximum filesize on a FAT volume is 4GB. That means that you cannot store a typical single-sided DVD image (4.5GB) or anything larger without splitting it into several parts.
- Filename handling in FAT can only be called weird. Traditionally, FAT used an 8.3 name scheme: eight uppercase ASCII characters for the “name” and three such characters for the “extension.” Longer names and those with lowercase letters inside are stored in special directory entries – see the box titled “Long File Names in FAT” for having some fun with FAT volumes. ExFAT is a relatively new (2006) member of the family of FAT filesystems that overcomes some of the classical FAT’s limitations. Thus, especially larger disks will be either NTFS- or ExFAT-formatted. But small SD cards and USB sticks still come FAT-preformatted, and if you still possess a floppy drive, it is very likely that all your floppy disks will be FAT disks.
| Long File Names in FAT |
|---|
|
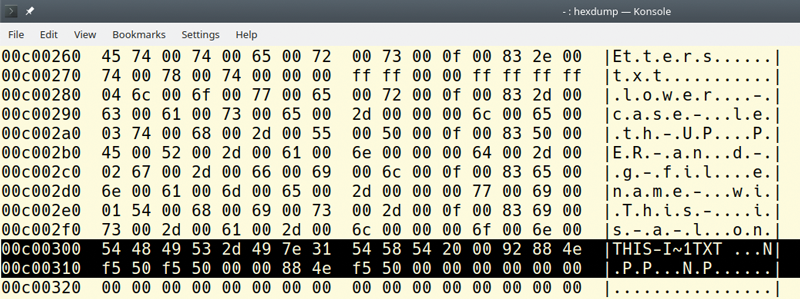
Modern filesystems let you use long file names with all sorts of lower and uppercase letters and other symbols taken from various alphabets. The whole range of UTF (or Unicode) encoded characters may occur in a file name, with very few exceptions: On Linux, only the slash (/) and the non-printable null character are “illegal.” When MS-DOS was developed in the early Eighties, it adopted the “8.3” file naming convention of CP/M, an even older operating system. FAT filenames can consist of eight uppercase ASCII characters for the “name” and three such characters for the “extension”: the position of the dot in such a name is fixed and the dot isn’t actually stored on the disk. File names are stored in directory entries with a fixed length of 32 bytes; the first eleven bytes of such an entry hold the name and extension, the rest stores file metadata. The early Windows versions were running on top of MS-DOS and thus restricted to the same file naming rules as DOS. With the introduction of Windows 95, Microsoft updated MS-DOS to allow for long file names, but in a weird way: The name is encoded in UTF-16 (where each character is represented by two bytes) and it is split into groups of 13 characters, with each group using one of the 32-byte directory entries in the filesystem. All such entries are marked as volume label entries (and thus ignored on older versions of DOS which have no long filename support). The first byte of each entry enumerates the entries which belong to the same file. None of those entries store metadata about the file, instead the directory must also contain a short file name entry which follows right after the last UTF-16-encoded entry, and this extra entry holds the metadata and a shortened and normalized version of the long filename. In Figure 3 it is highlighted – you can see how the long file name This-is-a-long-filename-with-UPPER-and-lower-case-letters.txt has been shortened to THIS-I~1.TXT. This handling of filenames was meant to guarantee some level of backwards compatibility: After creating files with long names, you can open them on older DOS systems by using the shortened name, and newer systems hide the short name. You can test this behavior by explicitly mounting a FAT volume as an msdos filesystem instead of the default (which Linux calls vfat). Run the following commands as root to test this. (Open a terminal window and become root by typing sudo su and entering your password when asked.) $ sudo su [sudo] password for root: # dd if=/dev/zero of=fat.img bs=1K count=1440 # mkfs.vfat fat.img # mount ‑o loop fat.img /mnt/ # touch /mnt/ abcdefghijklmnopqrstuvwxyz.txt # ls /mnt/ abcdefghijklmnopqrstuvwxyz.txt # umount /mnt # mount ‑t msdos ‑o loop fat.img /mnt/ # ls /mnt/ abcdef~1.txt # umount /mnt; rm fat.img With these commands you create a FAT-formatted floppy disk image (dd, mkfs.vfat), mount it to /mnt (mount), add a file with a long name (touch) and then un- and remount the image as an msdos filesystem (umount, mount). Linux displays the short file name in all lowercase letters (ls), but the internal representation on the disk is all uppercase. |
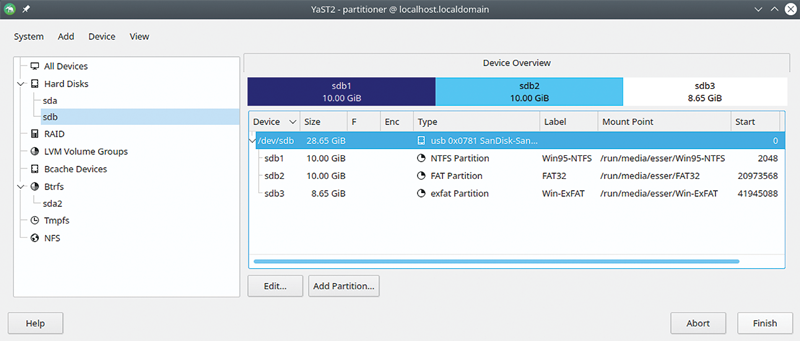
Accessing an external medium is easy: Just plug it in. Linux will detect the new device and ask you what to do with it. A large disk may have more than one partition so that several new volumes appear at once (Figure 4), whereas a USB stick or SD card will typically have only one filesystem. You are, however, free to repartition sticks and cards any way you like (Figure 5).

When you click on a new entry (either on the name or on the 2 actions for this device text), Linux will show you two options: Open with File Manager or Download Photos with Gwenview. Pick the File Manager to mount the volume and view its top level directory in Dolphin. You can also skip this decision and simply click on the triangle-and-line icon on the right of an entry which will mount the volume and do nothing (else).
Current openSUSE versions (like 15.4) also support the ExFAT filesystem out of the box which simplifies accessing such media a lot. If you run an older openSUSE release and encounter problems with ExFAT, you can install the fuse-exfat and exfat-utils packages, but on openSUSE 15.4 that is not necessary.
What about macOS?
If you happen to use an Apple Mac, macOS will by default format external media with HFS+ when you reformat them, but it will happily work with FAT- or ExFAT-formatted disks – they need no special treatment. OpenSUSE supports the HFS+ filesystem out of the box, so using HFS+-formatted media is as easy as using FAT disks.
The latest Apple filesystem is called APFS, and while macOS will not suggest you format USB sticks with APFS, you can choose to do so. OpenSUSE has no built-in APFS support, but you can install the libfsapfs package via YaST and then access your APFS disk from the shell. Note that this will give you read-only access – currently there is no driver that lets you write to APFS disks.
First you have to find out what device file you need to use. Open a terminal window and use the fdisk ‑l command to list all partitions:
$ sudo fdisk ‑l
Disk /dev/sdb: 28.7 GiB
Disk model: Cruzer Blade
...
Device     Start      End  Sectors  Size Type
/dev/sdb1     40   409639   409600  200M EFI System
/dev/sdb2 409640 60088279 59678640 28.5G unknown
In this case sdb2 is the partition we’re interested in. You can probe it with sudo fsapfsinfo /dev/sdb2 (which will reveal identifiers and volume names) and then manually mount it with
sudo fsapfsmount /dev/sdb2 /mnt
where /mnt is the mount point you want to use. Accessing the files will require root access, so open a privileged Dolphin window via the menu entry Applications | System | File Manager – Super User Mode and navigate to the right directory (press Ctrl+L and enter the path). When you’re done, unmount the disk with
sudo umount /mnt
In general, if you want to use a disk or stick with all three operating systems (Linux, Windows, and macOS), use the ExFAT filesystem. Windows, macOS and openSUSE Linux support it out of the box, and with older Linux versions it’s a simple package installation that gives you full compatibility.
Wrapping It Up
We’ve talked about Windows- and macOS-formatted media and looked at the necessary steps to access those FAT, NTFS, ExFAT, HFS+, and APFS filesystems. FAT and NTFS work out of the box, ExFAT needs a little help. If possible, it is better to avoid APFS because Linux cannot write to such a disk yet.
The box titled Permanent Mounts shows you an advanced trick that will make things easier for you if you use Windows and Linux on the same machine and intend to keep working with both operating systems.
| Permanent Mounts |
|---|
|
As you’ve seen, Windows partitions will not be mounted automatically when your system starts; instead you need to manually mount them, which requires entering the root password. You can automate the process and that lets you also select a better mount point (the directory from which you can access the partition). Under Windows, check which drive letters (C:, D:, and so on) exist for Windows partitions, and then create folders named
Look into the partition contents and identify which device file belongs to which Windows drive letter. You will then have a mapping such as sdb1 = C, sdb2 = E, sdb3 = D if there are three Windows partitions. For each of the relevant device files (for example: sdb2) type: sudo sh -c "grep sdb2 /etc/mtab >> /etc/fstab" in a terminal window (it is important to use the double greater-than sign, >>). When you’re done, edit /etc/fstab with root privileges, for example with the command: kdesu kate /etc/fstab find the entries for the device files and fix the values in the second column: replace the /run/media/username/… folders with the /win/… directories you have created. If you find the word fuseblk in the third column of an entry, replace it with ntfs. Now reboot: The partitions should get auto-mounted. With your Windows folders permanently available, you can improve the situation even further: Stop copying files from the Windows Documents folder to its Linux counterpart and back – instead use the Windows folder on Linux. The easiest way to do this is to remove the Documents folder in your Linux home directory and then recreate it as a link to the same-named Windows folder. Open /win/c/Users/username in one Dolphin window, your Linux home directory in a second window, and then drag and drop the Documents folder onto the home directory window. When you release the mouse button, select the Link Here option from the context menu – that’s it. Whenever you enter the Linux Documents folder in the future, you actually use the Windows folder. |
What we haven’t discussed here are the various additional ways to access files if you run several machines in a local network and enable file sharing – that is a bit more advanced.
This article originally appeared in Getting Started with Linux and is republished here with permission.


Comments