
Linux supports a wide array of filesystem types, including many that originated on other operating systems. The most common choices for hard disks, however, remain the native Linux ext3/4, followed by the high-performance XFS and Btrfs filesystems. For compatibility, knowing how to work with the VFAT filesystem is important, because it is the standard choice found pre-installed on many media, including USB thumb drives and flash disks. Additionally, several of the same utilities used to manage normal filesystems also apply to swap partitions, which the Linux kernel uses as virtual memory when RAM is scarce.
mkfs
The mkfs command (Figure 1) creates a new filesystem on a specified block device, such as a partition on a hard disk. The basic usage is:
mkfs ‑t <filesystem_type> </the/device>
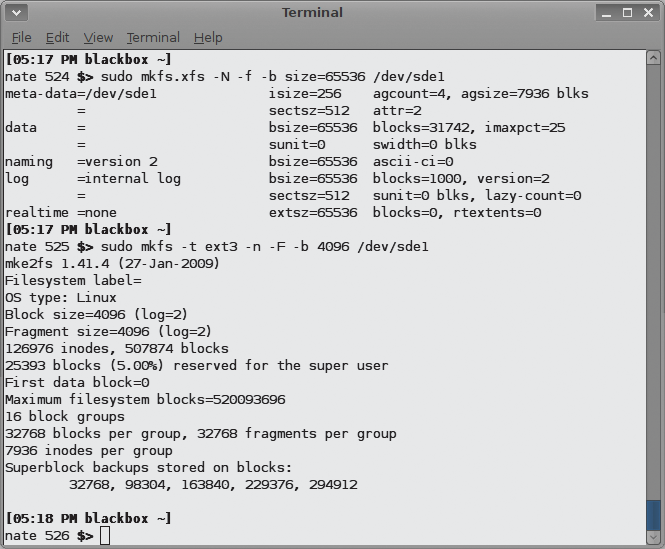
where <filesystem_type> is a Linux-supported filesystem type (e.g., ext3 or XFS) and </the/device> is the location of the target disk partition (e.g., /dev/sda1 or /dev/sdc3). Filesystem-specific options are added after <filesystem_type> (see also the “Filesystem Options” box).
| Filesystem Options |
|
The mkfs.<fstype> utility, where <fstype> is a filesystem supported by the command (e.g., ext3, ext4, XFS, Btrfs, VFAT), supports options that tweak filesystem settings such as the size of blocks used, number and size of inodes, fragment size, amount of space reserved for use by root-privileged processes, amount of space reserved to grow the group block descriptor if the filesystem ever needs to be resized, and settings for stripe, stride, and other details required for using the filesystem in a RAID array. All of these parameters have default settings, and unless you are sure you need to change them, you can safely create a filesystem with the default settings. Nevertheless, it is a good idea to familiarize yourself with the basics of filesystem parameters in general, in case you ever run into problems. The block size is the size of the chunks that the filesystem uses to store data – in a sense, it is the granularity of the pieces into which a file is split when stored on the disk. Larger block sizes can improve disk throughput because the disk can read and write more data at a time before seeking to a new location; however, a large block size can waste space in the presence of many small files, because a full block is consumed for each fragment of a file, even if only a small portion of it is used. Ext3/4 and XFS allow you to specify the block size (1024, 2048, 4096, etc.) by adding a ‑b flag; the syntax that follows the flag varies, so consult the manual pages for each option. The mkswap command creates a swap area on a disk partition, just as mkfs creates a filesystem. The basic syntax is the same, mkswap </the/swap/device>, with the optional ‑c flag again allows you to check the partition for bad blocks before creating the swap area. Just as a new filesystem must be attached to Linux’s root filesystem with mount before you can use it, a new swap partition must be attached with swapon ‑L </the/swap/device>. |
The basic form of the command described in the previous example hands off creation of the filesystem to one of several specialized utilities, depending on the filesystem type you specify (e.g., mkfs.ext3, mkfs.xfs, or mkfs.vfat). Because filesystems differ so much from each other, having specialized tools maintained by experts in the individual filesystems results in more stable code.
Most of these utilities implement the same options, although they vary according to the features implemented in the different filesystems. According to the mkfs man page, the general form of the command is now depracated in favor of these type-specific mkfs.* utilities.
Despite the differences, a few key options are common to all mkfs.* utilities. Adding the ‑c flag checks the specified device for bad blocks, which is then skipped over during the filesystem creation step. Adding the ‑v or ‑V flags produces verbose or extremely verbose output, respectively.
mkfs Examples
To format the first partition of the first drive on a system as ext4, you would run the command:
mkfs ‑t ext4 /dev/sda1
This command uses the default block size, inode parameters, and all other options, some of which are determined at run time when mkfs analyzes the geometry of the disk partition. Using
mkfs ‑t ext4 ‑b 4096 /dev/sda1
also creates an ext4 filesystem on /dev/sda1, but it forces the use of 4096-byte blocks. Running
mkfs ‑t ext4 ‑b 4096 ‑J device=/dev/sdb1 /dev/sda1
creates the same filesystem as the preceding command, but it creates the journal on a separate partition (/dev/sdb1).
To create an XFS partition on /dev/sda1, enter the following mkfs command:
mkfs ‑t xfs /dev/sda1
To specify the use of 4096-byte blocks on this filesystem, use
mkfs ‑t xfs ‑b size=4096 /dev/sda1
which is a different syntax than that used for ext4. The following command, which uses the alternative (and now preferred) mkfs.*
mkfs.btrfs ‑L mylabel </dev/partition>
creates a Btrfs filesystem with a 16-KiB default block size (where 1000KiB = 1024KB). To create a partition with a 4KiB block size, use:
mkfs.btrfs ‑L mylabel ‑l 4k </dev/partition>
The variations in syntax make it especially critical to refer to the man page for more on the use of mkfs with specific filesystem options.
Routine Maintenance
Running out of space on a filesystem is one of the most common problems you are likely to encounter on a Linux system, and it is not just an inconvenience for storage reasons – the system’s use of temporary files means that a full or nearly full root filesystem could interfere with normal operations.
To check filesystem usage, use df (Figure 2). When given no arguments, df returns a table summarizing usage of all of the mounted filesystems – in kilobytes and as a percentage of each filesystem’s total size. To get a report for a particular filesystem, specify it as an argument, such as df /dev/sda1.
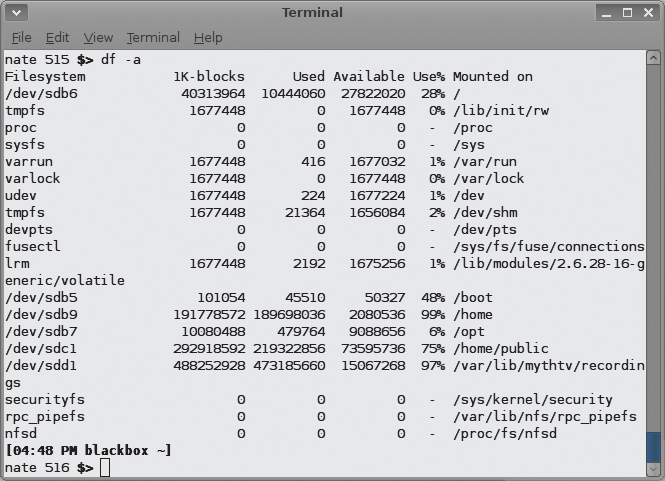
Also, you can pass a file name as an argument, and df will report on the filesystem that contains the specified file – which could be handy if you don’t remember where a particular filesystem is mounted. Finally, a few options exist to make df more useful: ‑i reports inode usage instead of block usage of the filesystem(s); ‑l limits the report to local filesystems only; ‑‑type=<filesystem_type> and ‑‑exclude‑type=<filesystem_type> allow you to limit or exclude output to a particular filesystem type.
On discovering a nearly full filesystem, you can further explore space usage with du. Executing du </some/directory> returns a list of the disk space occupied by each subdirectory beneath </some/directory>, expressed in kilobytes. Adding the ‑a option tells du to report the space used by the files in addition to the directories.
Both commands are recursive. If you do not provide a directory as an argument to du, it reports on the current directory. The ‑c option produces a grand total in addition to individual usage statistics. Other helpful options are ‑L, which could help track down an errant large file, following all symbolic links; ‑x, which limits the scope of the search to the current filesystem only; and ‑‑max‑depth=N, which allows you to limit the number of recursive subdirectories into which you descend. This option is very helpful when dealing with a large file library.
Several utilities exist to help you get better performance out of your filesystems. The tune2fs program lets you control many parameters of ext2, ext3, and ext4 filesystems. You can set the number of mounts between automatic filesystem integrity checks with tune2fs ‑c N, set the maximum time interval between checks with tune2fs ‑i N[d|m|w] (where d, m, and w are days, months, and weeks, respectively), or add an ext3 or ext4 journal to a filesystem that does not have one with tune2fs ‑j. Additionally, you can adjust RAID parameters, journal settings, and reserved block behavior, as well as change parameters manually, such as the time last checked and number of mounts, which are usually reported automatically.
Other utilities are associated with specific filesystems. Btrfs has a separate utility for resizing filesystems (btrfs filesystem resize). The btrfs‑convert tool can migrate data from existing ext2/3/4 volumes to the Btrfs filesystem.
XFS also provides a defragmentation tool called xfs_fsr that can defragment a mounted XFS filesystem, and Btrfs supports defragmentation of metadata or entire filesystems. The
btrfs filesystem defragment ‑r ‑v /
command defragments the entire filesystem verbosely. No such utilities exist for ext3, but ext4 has e4defrag.
Troubleshooting
If you suspect trouble on a filesystem, you can run
fsck /a/<device>
to check and make repairs. If you run fsck with no target device specified, it will run checks sequentially on all of the filesystems in /etc/fstab.
The filesystem-specific error-checking programs – e2fsck for ext2, ext3 and ext4, btrfsck for Btrfs, and fsck.vfat for VFAT – support many of the same options, but again, the syntax may vary, so it is critical to read the man page for the filesystem checker before attempting any repairs.
When corrupted, VFAT filesystems suffer from bad clusters, bad directory pointers, and even bad file names. The fsck.vfat tool can find and correct many of these problems. Like the others, it can be called in non-interactive mode for use in scripts, and it can mark bad clusters automatically to prevent their reuse in the future. The ‑V flag tells fsck.vfat to run a second check after it has tried to correct any errors.
XFS has separate error-checking and repair utilities: xfs_check and xfs_repair (see the man pages for more on command-line options).
For ext2/3/4 problems, the debugfs tool lets you examine a filesystem and correct errors interactively. It can step through and work within a filesystem with commands similar to those of a typical Linux shell, such as cd, open, close, pwd, mkdir, and even chroot.
This article originally appeared in the Linux Shell Handbook and is republished here with permission.
Want to read more? Check out the latest edition of Linux Shell Handbook.


Comments