
Sometimes a bit of testing saves the day if you can do it on a disposable Linux machine of some sort. That testing could include installing new software that might be a little invasive, installing lots of hidden, tiny files that would clog up your desktop machine, or maybe trying out unstable software that is not fully released, meaning that your desktop machine might not boot up post-installation. Equally, you might be writing system scripts that you need somewhere safe to run in case they break your other precious settings.
In this article, we will look at running a second Linux desktop, or virtual machine (VM), inside your main desktop. To do this, we will be using a fantastic piece of virtualization FOSS software called QEMU. It dutifully sits atop the second-to-none KVM, which provides a lower level of virtualization. If that sounds confusing, there's more information in this article.
Among the many benefits, one considerable advantage of using QEMU and KVM is that you have a wide range of Linux distributions that you can install on the second desktop, giving you lots of flexibility.
Diving in
First things first: You will need a laptop or machine that returns a number greater than zero when you run this command:
$ grep -Eoc '(vmx|svm)' /proc/cpuinfo
4
This confirms that your CPU supports virtualization properly. If not, please search online for other ways of running QEMU and KVM, on potentially slightly older hardware.
The next step is to check that KVM is happy to work as hoped, by installing this package:
$ apt install cpu-checker
And, then running this command:
$ kvm-ok
INFO: /dev/kvm exists
KVM acceleration can be used
Great. We can see that KVM is in good shape, so we can proceed.
Without further ado, we’ll install QEMU. The command to do this on an Ubuntu machine (I’m actually using Linux Mint, with Ubuntu 20.04 running its engine underneath) is as follows, executed as the superuser, “root”:
$ apt-get install qemu-kvm qemu virt-manager virt-viewer bridge-utils
This prompts you to check that you want to install the following packages (on my laptop at least) as seen in Listing 1.
Listing 1: The packages that my laptop needed to install the excellent QEMU.
The following NEW packages will be installed
cpu-checker gir1.2-gtk-vnc-2.0 gir1.2-gtksource-4 gir1.2-libosinfo-1.0 gir1.2-libvirt-glib-1.0 gir1.2-spiceclientglib-2.0 gir1.2-spiceclientgtk-3.0 ibverbs-providers ipxe-qemu
  ipxe-qemu-256k-compat-efi-roms libcacard0 libfdt1 libgovirt-common libgovirt2 libgtk-vnc-2.0-0 libgvnc-1.0-0 libibverbs1 libiscsi7 libnss-mymachines libosinfo-1.0-0 libphodav-2.0-0
  libphodav-2.0-common libpmem1 librados2 librbd1 librdmacm1 libslirp0 libspice-client-glib-2.0-8 libspice-client-gtk-3.0-5 libspice-server1 libusbredirhost1 libusbredirparser1 libvirglrenderer1
  libvirt-clients libvirt-daemon libvirt-daemon-driver-qemu libvirt-daemon-driver-storage-rbd libvirt-daemon-system libvirt-daemon-system-systemd libvirt-glib-1.0-0 libvirt0 libxml2-utils
  msr-tools osinfo-db ovmf python3-distutils python3-lib2to3 python3-libvirt python3-libxml2 qemu qemu-block-extra qemu-kvm qemu-system-common qemu-system-data qemu-system-gui qemu-system-x86
  qemu-utils seabios sharutils spice-client-glib-usb-acl-helper systemd-container virt-manager virt-viewer virtinst
0 to upgrade, 64 to newly install, 0 to remove and 0 not to upgrade.
The QEMU site has lots of clearly written documentation from which to learn more. In case you’re confused by some of the documentation, we're going to opt for the User Mode emulation and not the Full System emulation.
Next, we need to check that libvirtd is running, like so:
$ ps -ef | grep libvirt
root        8989       1  0 14:08 ?        00:00:00 /usr/sbin/libvirtd
libvirt+    9061       1  0 14:08 ?        00:00:00 /usr/sbin/dnsmasq --conf-file=/var/lib/libvirt/dnsmasq/default.conf --leasefile-ro --dhcp-script=/usr/lib/libvirt/libvirt_leaseshelper
Look for “libvirtd” being present in the output as above, to check that it is running.
Now, having installed all of the above packages as the “root” user, we need to add our login user, which is “chris” in my case. Doing so means that, from the main desktop, we can create virtual machines with QEMU via the excellent, graphical Virtual Machine Manager software.
Add your user, changing “chris” to your username now, as follows:
$ usermod -aG libvirt chris
$ usermod -aG kvm chris
Now we need a quick reboot to be sure that is applied.
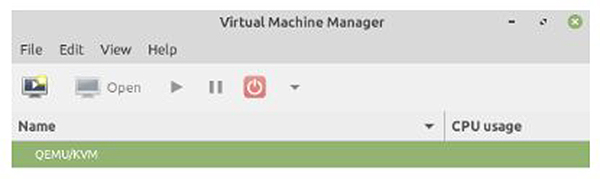
After your laptop or machine has booted up again, open this application (search for “Virtual Machine Manager” from the start menu) so that a visual box like the one in Figure 1 appears.
Figure 1: Via the Virtual Machine Manager user interface, QEMU and KVM are green and connected.
Flavorsome
Now we need to choose a Linux flavor. I’m a big Debian fan so, from this page, we will choose this image because it’s very small in size to download. Save this somewhere you can find it, because you’ll need it straightaway.
In Figure 2, you can see what happens after clicking File/New Virtual Machine, where we stick to the top option of installing our local Debian image download into a VM.
Figure 2: Choose the ISO option to install Debian, which we downloaded.

Having clicked the Forward button in Figure 2, we can then select Browse/Browse Local at the bottom and navigate to our freshly saved local Debian image. Click Forward, once again.
At this stage, you get to pick how much memory to offer your virtual machine. If you have 2GB spare, add at least that for a graphical desktop, but your setup depends on a few other factors. I chose 2GB (2048 MB) and 2 CPU cores here. The more resources that you give, the quicker the installation usually. Click Forward again.
Next, you’ll need to decide how large you want your VM’s disk to be. I’d recommend 20GB. Click Finish this time and be patient on slow machines. In Figure 3, we are greeted with something to behold.
Figure 3: Happiness is the Debian logo.

Our next task is installing the venerable Debian operating system. We’ll choose the Graphical Install method. You can do that by just hitting the Enter key. Note the helpful tip at the top of the window telling you to hit the CTRL and ALT keys together in order to escape the dialog box and get the mouse pointer back for your main desktop.
Figure 4: Only 512MB of memory is spotted by Debian and flagged as an issue when we’ve chosen the Graphical Install.

As a test, I chose only 512MB RAM for my installation at one point, and, as we can see, the excellent Debian warns us as much in Figure 4. Fret not, though, you might be able to bump up the RAM at launch time post-installation if you wish.
If you proceed, you’ll be asked about your regional location, keyboard, and language; just remember the CTRL-ALT combination to escape from the user interface of the second desktop window.
After a few minutes, you can see progress bars whiz past, and packages are installed into the 20GB flat-file disk—the one that we created a moment ago. Figure 5 is an example of low graphics mode; you can expect a much slicker view in full graphics mode.
Figure 5: Things are progressing nicely, as seen using low graphics mode.

You’ll then get a network hardware test, which if successful should configure IPv4 and IPv6 IP addresses using some clever under-the-covers wizardry so that your second desktop can connect to the internet. In Figure 6, we get asked about the naming of our second desktop.
Figure 6: What’s in a name? This is the screen to confirm your hostname.

When asked about the domain name for this machine in the next dialog box, I just added “something.tld” to populate the field. Next, you’ll need to choose a password for the “root” user. Then, enter your non-superuser username (like “chrisbinnie” or “chris”) and choose a password for that user as well.
Following some more whirring inside the hard disk for the second desktop, a little while later choose Guided—Use Entire Disk for the partitioner screen choices. Next, just choose all files in one partition unless you know what you’re doing. Then click Finish and select Yes, when prompted to save the new partitions.
The next stage involves lots more package installations. If you’re familiar with Linux, you’ll see lots of names that you recognize as the base system is installed.
Proof of the Pudding
To make sure that we’ve got a working Debian installation, courtesy of the excellent QEMU, we will now open up a browser. We’ll visit a website to check that our DNS lookups are working, that our network connectivity is functioning as expected, and that we can interact with our second desktop in a suitable fashion.
Note that you can resize the window for the second desktop to whatever size your hardware will allow. There may be option buttons missing at the foot of the installation screens if you don’t.
With some patience—and remember you can increase the amount of memory to speed the installation up—you’ll be presented with an option to scan a CD. Choose No, when asked about CD scanning and then decide if you want to opt out of the survey.
On the next few screens, I’m going to only tick the standard desktop environment and then hit the Tab key to continue. Only choose that option if you chose lots of RAM earlier, as otherwise the installation will be very slow. When you’re asked about the GRUB bootloader, make sure you don’t choose “manually” but instead select the entry saying “/dev/vda” or similar about where to install GRUB.
After the installation is complete, you’ll be returned to the first Debian installer screen because your second desktop will reboot. You should now Continue.
In Figure 7, we can see the boot-up process. And, in Figure 8, after logging in and clicking Activities on the top-left and then the orange Firefox icon, we can see what happens when you visit the website.
Figure 7: Our second desktop is booting up after the installation.

Figure 8: That’s just what we were looking for: a fully functional second desktop with network connectivity.

You should be able to navigate around your second desktop in exactly the same way you would any other Linux installation. Try opening a few different packages and also launching a command line. Figure 9 shows the built-in desktop environment with Debian.
Figure 9: The standard desktop manager in Debian with fully functioning networking, including all the bells and whistles of a standard Linux installation.

The End
I’m sure that you can see the value of having a second desktop (or server for that matter), which is fully compatible and perfect for testing. What’s more, with this setup, you can run Ubuntu, Debian, or Fedora within Ubuntu or choose from lots of different Linux distributions so that you can safely try them out before using them as a primary Linux flavor.
The basics of QEMU are very straightforward to fathom and it's definitely battle-hardened, thanks to the fact that it’s been around for a number of years. The online documentation is also plentiful if you get stuck. I hope you’ll give it a try yourself soon.
Ready to find a job? Check out the latest job listings at Open Source JobHub.

Contact FOSSlife to learn about partnership and sponsorship opportunities.


Comments