
Many Raspberry Pi projects are "headless," which means they don't have an attached monitor, keyboard, or mouse. When it comes time to read the screen. Going without a monitor will keep the cost of your Rasp Pi low. You can always access the system with Secure Shell, better known as SSH.
SSH is simply a secure, encrypted way of remotely logging in to a computer. OpenSSH, a free set of SSH tools developed by the OpenBSD project, is included in Linux distributions. If you're using a recent version of a Linux distribution meant for the Raspberry Pi, the SSH service is almost certainly already available. The easiest way to find out without attaching a monitor and keyboard is to attempt to SSH to it.
If the instructions don't work and you suspect SSH is not installed, plug in a monitor and keyboard, then at a shell prompt, enter:
$ service ssh status
If SSH is working, it returns something like Listing 1 or just sshd is running. If SSH is not available, you can install it easily. On an RPM-based distribution like Pidora (the Fedora Raspberry Pi remix), use:
$ sudo yum install openssh-server openssh-clients
On a Debian-based distribution, such as Raspbian, use:
$ sudo apt-get install ssh
Once you've installed it, you can enter:
$ sudo /etc/init.d/ssh start
to start the sshd daemon (that's the "d" at the end).
Listing 1: Checking for SSH
'Redirecting to /bin/systemctl status  sshd.service
sshd.service - OpenSSH server daemon
          Loaded: loaded (/usr/lib/systemd/system/sshd.service; enabled)
          Active: active (running) since Wed 2013-02-13 13:06:40 EST; 28min ago
         Process: 273 ExecStartPre=/usr/sbin/sshd-keygen (code=exited, status=0/SUCCESS)
        Main PID: 280 (sshd)
          CGroup: name=systemd:/system/sshd.service
                  280 /usr/sbin/sshd -D
Find your Raspberry Pi's IP Address
Before you can connect via SSH, you'll need your Raspberry Pi's IP address. Of course, you could start with a monitor and keyboard setup before going headless, and in that case, you would just start it up and find the IP address using ifconfig. However, I'll assume the dog ate your HDMI cable and you're going headless from the start.
Pidora takes advantage of two tools called ip-read and ip-flash to make running in headless mode easier. With some simple configuration additions on your SD card, your Raspberry Pi will announce its assigned IP address (using eSpeak) through attached speakers two minutes after it is powered on. Thirty seconds later, it will also flash the IP address on the Pi's OK/ACT LED.
To begin, plug in the SD card loaded with the Raspberry Pi operating system of your choice. Next connect the Pi via an Ethernet cable to to the network (see also the "Laptop SSH" box); then, plug in the power to start Pi. Remember, just because you're not watching the Raspberry Pi boot up on a screen doesn't mean it doesn't take the same amount of time. Give it a few minutes to boot up.
| Laptop SSH |
|---|
| If you're only interested in SSHing directly between your laptop or desktop and the Rasp Pi, instead of through an established network, you'll find an in-depth guide with instructions for Windows, Mac, and Linux machines online. |
Next, you can use your router's internal IP address to see where the Pi is connected. Your router's default internal IP address is listed in its manual and quite possibly on a sticker somewhere on the hardware. If you haven't intentionally changed it, many commonly used routers default to 192.168.0.1, 192.168.1.1, or 192.168.2.1. If none of those sound familiar, check for yourself with
$ route -n
which will output something like Table 1.
Table 1: Kernel IP Routing Table
| Destination | Gateway | Genmask | Flags | Metric | Ref | Use Iface |
|---|---|---|---|---|---|---|
| 0.0.0.0 | 192.168.0.1 | 0.0.0.0 | UG | 0 | 0 | 0wlan0 |
Although you'll see several lines, you want the one with the UG flags, which indicate the status of the route (up, U, or active) and the gateway for the route (G). The numbers under "Gateway" are what you're looking for.
Most routers will send you to a control panel if you enter that address in a web browser. Log in if required and find the list of devices connected to your network. Look for one named raspi or raspberrypi and note the IP address.
SSH to the Raspberry Pi
Once you know your Pi's IP address, you can connect to it by typing
$ ssh <username>@<host>
where host is the IP address you found for your Raspberry Pi. The username is either an account that you've set up on the machine, or, if this is a fresh installation, the default account for the operating system you've chosen. Table 2 shows a few of the default logins for commonly used Raspberry Pi operating systems.
Table 2: Default Logins
| Distribution | Default login::password |
|---|---|
| Arch Linux ARM | root::root |
| OpenELEC | root::openelec |
| Pidora | root::raspberrypi |
| Raspbian wheezy (and derivatives like Raspbmc) | pi::raspberry |
If you're using another distribution, check its documentation for the default login and password combination. You can also consult the table online.
For the rest of these examples, I'll use 192.168.0.115 as the Raspberry Pi's IP address and fedora as the username. Change these as appropriate for your own IP and Raspberry Pi user.
When you log in to a machine for the first time, it checks your .rhosts file and creates a random key; then, it checks this key to be sure you've connected to the host you intended. The first time you connect, you'll see something like:
$ ssh fedora@192.168.0.115
The authenticity of host '192.168.0.115 (192.168.0.115)' can't be established.
RSA key fingerprint is 83:d7:be:fe:5e:91:98:90:ff:eb:87:0b:88:d2:e9:e9.
Are you sure you want to continue connecting (yes/no)?
When you enter yes, you'll see:
Warning: Permanently added
'192.168.0.115' (RSA) to the list
of known hosts.
If you've logged in on a system that starts you as root, the first thing you'll want to do is create a user account to use rather than doing everything as root.
The second thing to do is disable SSH by root. To do this, type
$ vi /etc/ssh/sshd_config
and uncomment the line that says PermitRootLogin yes, then change the yes to no.
If you would prefer to let only specific users SSH to your Raspberry Pi, you can list them in the sshd_config file as well. At the end of the file, add AllowUsers with the list of usernames that should be allowed to connect via SSH:
AllowUsers hannah ian
To make the change take effect, restart the service:
$ service sshd restart
To leave the SSH session and return to your local computer's shell prompt, type the exit command.
Setting Up your Distribution
If you're using Pidora, it would usually run a shell script the first time you boot up that has you set up the root password and a user; however, this script runs only if input devices are detected. If Pidora is booted headless, the system will configure the Ethernet interface via IPv4 DHCP, allowing you to access the system through SSH. You can set up any other preferences once you've connected.
When you first boot a headless Raspberry Pi on Raspbian wheezy, you'll see:
NOTICE: this Raspberry Pi has not
been fully configured.
Please run 'sudo raspi-config'
If you had logged in from the Pi itself, the raspi-config tool would have launched automatically. You can now run it from the SSH session to set up the Raspbian installation as if you were directly on the machine.
Generate a Public/Private Key Pair
In public key cryptography, you create a public key to encrypt data and a private key to decrypt it. It might make more sense to think of the public key not as a key but as a lock that the private key opens. Thus, you can freely send your public key to other systems or over email. For better security, you should protect your private key with a passphrase when you create it. All of this is easy to do, and you can create separate keys if you have accounts for multiple systems. To get started, create a key pair:
$ ssh-keygen
You will be prompted for a directory to which you save the key and a passphrase. The passphrase can be just that -- a set of words with spaces and so on -- so make it a good one and make it something you can remember. The information you enter is shown in angle brackets in Listing 2.
Listing 2: Generating a Key Pair
Generating public/private rsa key pair.
Enter file in which to save the key (/home/fedora/.ssh/id_rsa): <press Enter>
Created directory '/home/fedora/.ssh'.
Enter passphrase (empty for no passphrase): <your chosen passphrase>
Enter same passphrase again: <your chosen passphrase>
Your identification has been saved in /home/fedora/.ssh/id_rsa.
Your public key has been saved in /home/fedora/.ssh/id_rsa.pub.
The key fingerprint is:
3f:9e:8d:65:1b:0f:45:f7:22:a7:69:b3:c4:4d:8d:de fedora@raspi.local
The key's randomart image is:
+--[ RSA 2048]----+
|  ** ** ** ** ** ** ** ** ** ** ** ** ** ** ** |
|  ** ** ** ** ** ** ** ** ** ** ** ** ** ** ** |
|  ** ** ** ** ** ** ** ** ** ** ** ** . .|
|  ** ** ** ** ** ** ** ** ** ** ** . +.|
|  ** ** ** ** ** ** S  ** **. * o|
|  ** ** ** ** ** ** ** . . X o |
|  ** ** ** ** ** ** ** ** o % o E|
|  ** ** ** ** ** ** ** . X B  ** **|
|  ** ** ** ** ** ** ** ** + + .  **|
+-----------------+
Next, copy the public key that you created onto the Raspberry Pi:
$ ssh-copy-id fedora@192.168.0.115
fedora@192.168.0.115's password: <enter your password>
Try logging in to the machine, with ssh 'fedora@192.168.0.115' (use your IP address) and check in the
~/.ssh/authorized_keys
file to make sure you haven't added extra keys that you weren't expecting.
This procedure will make connecting to your Pi one step faster because you won't have to enter a password each time.
Create Users
To add new users who can SSH to the Raspberry Pi, you simply add users to the system,
$ sudo useradd newuser
$ sudo passwd newuser
and then create keypairs for these new users.
If you're using Pidora and are more comfortable creating users through the GUI, follow the instructions in the section "Use Graphical Programs over SSH"; then, start the system-config-users tool.
Transferring Files to and from the Raspberry Pi
The two ways you're mostly likely to transfer files to your Raspberry Pi through the command line are via SCP (secure copy) and SFTP (secure file transfer protocol). The first tool, scp, is most useful when you just want to copy a small number of files and then exit. If you want an open connection from which you can run a series of interactions, you should use sftp instead. You don't have to SSH into the Raspberry Pi first to use scp. The command format is:
$ scp <filename> <username>@<hostname>:</path/to/destination/>
To copy the opensource.odt file from your current directory (enter a full path if you are not in the file's directory) to the web directory of your Raspberry Pi with IP address 192.168.0.115 and user fedora, type the command:
$ scp opensource.odt fedora@192.168.0.115:/var/www/html/
You can copy an entire directory (e.g., foss) by using the -r flag, which tells scp to descend through the directory recursively, copying its contents.
$ scp -r foss fedora@192.168.0.115:.
Note in the previous example, that rather than specifying a directory at the end of the line, you enter only a period. This step will copy the file or directory into the fedora user's home directory.
For a secure version of FTP, you can use SFTP, which uses the SSH protocol for file transfer. With this tool, you connect much as you would if you were using ssh, except you use ;sftp;:
$ sftp fedora@192.168.0.115
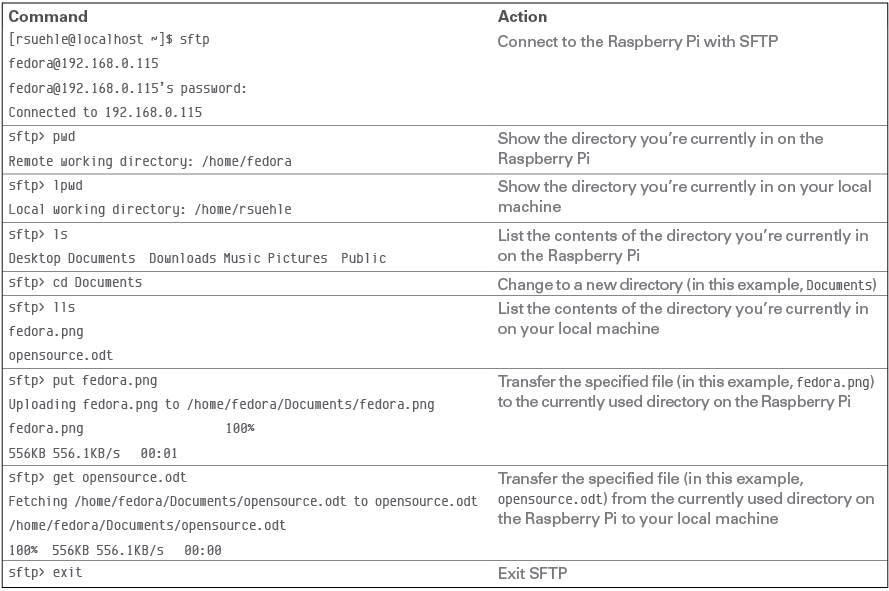
You now have an SFTP session open through which you can use a variety of commands. Table 3 shows a sample SFTP session demonstrating the most common commands you'll need, which you'll see is similar to working in the shell.
Table 3: Example SFTP Session
Using Graphical Programs
When you use the graphical interface of your Linux machine, the interaction happens through the X Window System, more commonly referred to simply as X. If you want to start a GUI application over SSH, you need to add the -X flag when you connect to enable X forwarding, which "forwards" graphical programs through your remote connection:
$ ssh -X fedora@192.168.0.115
Note that you use a capital X. A few applications just won't run over X forwarding. If, however, you think it should be working (e.g., you've run this application through X forwarding on another machine, but it isn't working on the Raspberry Pi), check that X11Forwarding is set to yes in /etc/ssh/sshd_config. You should then be able to launch graphical programs on the Pi from your SSH session to use on your remote screen. To test this, type midori at the prompt to launch the lightweight browser included with most Raspberry Pi Linux distributions.
With these tools, you're ready to tackle just about any task without adding the size or cost of a monitor and keyboard to your Raspberry Pi.
This article originally appeared in the Raspberry Pi Handbook and is reprinted here with permission.
Want to read more? Check out the latest edition of Raspberry Pi Handbook.
Ready to find a job? Check out the latest job listings at Open Source JobHub.


Comments