
Whether you are training to become an IT specialist, managing networks, or preparing for the Linux Professional Institute second certification (LPIC-2), you can't avoid the topic of firewalls, especially rules for filtering packets on the network. After ipchains and Ipfw, the netfilter project’s iptables is mostly commonly used for configuring firewall rules on Linux, while FreeBSD/NetBSD and the two Solaris successors Illumos and OpenIndiana use IPFilter.
However, iptables is getting a little long in the tooth. In particular, the program code has become increasingly complex. Small changes in the project core have tended to affect all related tools. Iptables, ip6tables, ebtables, and arptables all come from the same codebase, but not in the form of modules. Instead they rely on code duplication, which has resulted in the four tools drifting apart over time. Iptables has been the best maintained, while ebtables has been neglected. Bugs fixed in iptables are still unfixed in ebtables years later.
This situation prompted the netfilter project to launch the development of an iptables successor, nftables, as early as 2009. The first two letters in nftables are derived from the project (netfilter). The stated development goals include higher data throughput, greater scalability with a view to changing requirements, and -- in particular -- a modular structure leading to improved maintainability. Starting with Linux 3.13 (January 2014), nftables is part of the Linux kernel, using proven in-house components by the netfilter project.
Since the release of Debian 10 "Buster" in early July 2019, Debian also uses nftables, which in turn has affected derivatives such as Ubuntu and Linux Mint, as well as Red Hat Enterprise Linux (RHEL) and CentOS v7 and later. All major distributions have included nftables for quite some time. While they don't necessarily enable nftables by default, it is at least operational.
Removals and Conversions
To create firewall rules, you need the iptables (IPv4), ip6tables (IPv6), arptables (ARP packets), and ebtables (Ethernet frames) command-line tools. Nftables replaces all four with a single command-line tool named nft, which you can use to set all the rules for accepting, forwarding, modifying, or dropping packets from the network on the system.
While iptables uses various filters and the three processing chains INPUT, FORWARD, and OUTPUT to forward the packets, you have to define these yourself for the nftables framework to recognize them.
The nft tool draws on two libraries: libnml, a minimalist Netlink library, and libnftml, a Netlink userspace library. This results in a reduction of code size in the Linux kernel, and minor changes to nft do not prompt the need to rebuild the kernel.
To ensure that the correct kernel module has been loaded into the system kernel, check the output from the modinfo (Figure 1) and lsmod (Figure 2) commands. Once this has been confirmed (as shown in Figures 1 and 2), you can start using nft directly.Figure 1: The modinfo command's output provides information about the kernel module.
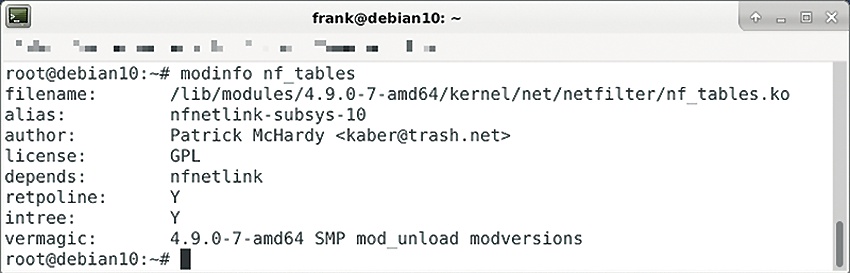
modinfo command's output provides information about the kernel module.
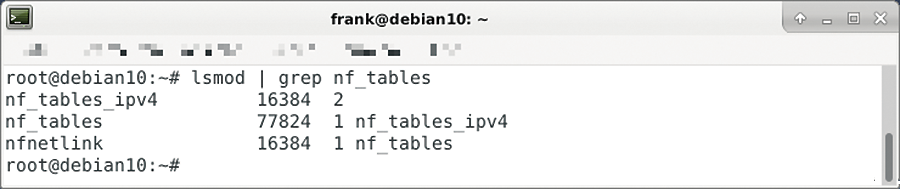
lsmod to find out if the system has the kernel module in place.
Basic Configuration
Initially, nftables starts with a completely empty ruleset; there are no predefined tables, chains, or rules. As a user (or admin), you first create the tables, add chains to the tables that hook into the Linux kernel as netfilter hooks, and then fill the chains with the appropriate rules. All of the above steps are done using the nft command, which you execute as root.
Listing 1 demonstrates how to define a firewall that prevents (currently) any packets from passing through. Line 1 creates a table for IP packets of the filter type. Line 2 adds a chain to the filter table. Line 3 adds a rule to the chain that drops all packets (drop).
Listing 1: Defining a Firewall
01 # nft add table ip filter
02 # nft add chain ip filter input {type filter hook input priority 0\;}
03 # nft add rule ip filter input drop
04 # nft list ruleset -a
05 # nft delete rule ip filter input handle 2
Line 4 provides an overview with all the firewall's rules (Figure 3). Next to the entries, you will see comments formatted as # handle NUMBER; you use these comments to reference the entries. This is especially interesting if you want to delete or change existing definitions or insert new definitions in front of or after the entries. For example, line 5 deletes the drop rule.
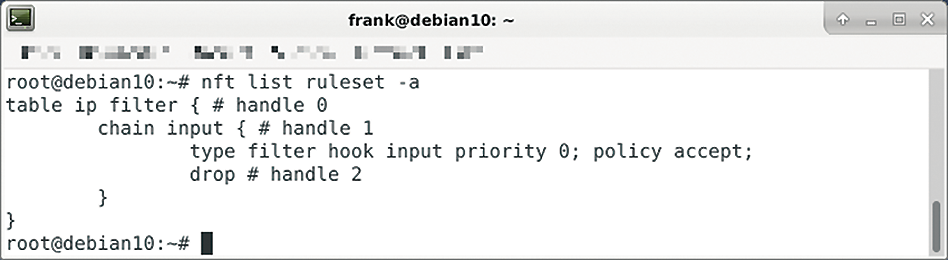
nft list ruleset -a command lists all enabled rules.
Basic Operation
When it comes to writing the rules, the nft developers rely on the Berkeley Packet Filter (BPF) and use the classic tcpdump as a guide, so you don't have to learn everything from scratch.
In addition, nft also provides a number of address families. The predefined familes are arp (ARP), bridge (previously provided by ebtables), inet (covers IPv4 and IPv6), ip (for IPv4), ;ip6 (for IPv6), and netdev (which is used to filter incoming packets before they reach Layer 3 according to the ISO/OSI specification).
The nft tool acts as a translator of the rules and keeps them in a small virtual machine (nftables core) for communication with the Linux kernel.
Where appropriate, I will compare the spelling and calls in iptables and nft based on practical examples. Listing 2 shows how to enable port 22 for incoming packets, just as you would for access via SSH, for both iptables and nft. You will notice that nft reduces this to a single command with simpler syntax.
Listing 2: Enabling Port 22 for Incoming Packets
### Allow incoming packets on port 22.
### With Iptables:
# iptables -A INPUT -p tcp --dport 22 -m conntrack --ctstate NEW,ESTABLISHED -j ACCEPT
# iptables -A OUTPUT -p tcp --sport 22 -m conntrack --ctstate ESTABLISHED -j ACCEPT
### With Nft:
$ nft add rule inet filter input tcp dport 22 ct state new,established accept
If you want to add ports 80 and 443 (i.e., HTTP and HTTPS), you need two more lines for iptables per port. With nft, on the other hand, it is sufficient to extend the existing line to combine all three protocols in one go. All three ports are enclosed in curly brackets, starting with port 22 followed by ports 80 and 443 separated by commas (Listing 3).
Listing 3: Adding Two Additional Ports
# nft add rule inet filter input tcp dport { 22, 80, 443 } ct state new,established accept
Please note that the spaces inside the brackets in Listing 3 must be exactly as shown -- otherwise Bash will choke and protest. Users of Zsh run into the same problem, which can be solved by quoting appropriately.
Save and Restore
Similar to iptables, the nftables configuration can be saved to a file. Line 1 in Listing 4 writes the current ruleset to the firewall.config file, and line 2 reads the configuration back in.
Listing 4: Saving nftables Configuration
01 # nft list ruleset > firewall.config
02 # nft -f firewall.config
To make sure that there are no other (possibly interfering) rules left in the cache before initializing the firewall, you should add the line flush ruleset at the beginning of the configuration file firewall.config.
Creatures of habit, humans have a hard time with change. To help out with the transition from iptables to nft, the iptables-translate and ip6tables-translate commands convert the spelling of iptables firewall rules to those of nftables (Listing 5). This works for both individual instructions and complete rulesets.
Listing 5: Converting Rules
$ iptables-translate -A INPUT -p tcp --dport 22 -m conntrack --ctstate NEW -j ACCEPT
nft add rule ip filter INPUT tcp dport 22 ct state new counter accept
$ ip6tables-translate -A FORWARD -i eth0 -o eth3 -p udp -m multiport --dports 111,222 -j ACCEPT
nft add rule ip6 filter FORWARD iifname eth0 oifname eth3 meta l4proto udp udp dport { 111,222} counter accept
Conclusions
Nftables helps to group several complex tools under a common umbrella, making it easier to secure the network. To thoroughly test the new firewall ruleset, you can, for example, use a bunch of Raspberry Pis on a small, dedicated network. Alternatively, you can create a virtual test network using VirtualBox or the smart Mininet application.
Acknowledgements
The author would like to thank Axel Beckert and Werner Heuser for feedback during the preparation of this article.
This article originally appeared in Linux Magazine and is reprinted here with permission.
Want to read more? Check out the latest edition of Linux Magazine.


Comments