
Linux and other Unix-like systems use the root account for system administration. Traditionally, only root has full control over the system’s hardware and software settings, an arrangement that helps guard against external attacks. Other users might have some control over their personal settings, but they cannot edit, or sometimes even view, key system files.
Traditionally, the administrator became “root” by logging in to the root account with a root username and password. However, a full login to root creates security problems. For example, if the user walks away from the keyboard, the system is left in a state in which an intruder – physical or remote – can severely compromise the system. Even worse, users might forget to log out and back in again for end-user tasks, leaving the system potentially vulnerable.
In many cases, however, a full root login is unnecessary. The administrator might only need root privileges to run one or two commands, such as checking a system logfile or configuring a new printer. The advantage of su and sudo is that they open the root account only for specific tasks. Once the tasks are done, users return quickly to their regular tasks, thereby minimizing the amount of time the system is vulnerable.
The root user can also use su to switch between accounts more quickly than with conventional logins. Similarly, developers can use su to run test accounts with different environments. The main purpose of su and sudo, though, is to minimize the security risk involved in using root.
su and sudo have similar but different goals. Although both can run on the same system, many OS vendors tailor their systems around one or the other tool. The su command typically prompts the user to enter the root password, so it only works out of the box on systems that configure the root account. Some Linux distributions, such as Ubuntu and Knoppix, don’t bother assigning a root password and therefore depend on sudo to let normal users execute administrative commands.
su: Environments and Quick Commands
The name su stands for “substitute user.” The command is a quick replacement for logging in and out of accounts in the usual way. To use su, all you need to do is enter the basic command followed by a username. If you are in an ordinary account, you then enter the password for the account; if you are currently root, you switch into the account automatically. When you are finished using the account, enter logout or exit or press Ctrl+D to return to the account in which you started. Should you become confused about which account you are in, you can type the whoami command to orient yourself. If you do not specify a username after the su command, the system logs you into the root account (Figure 1).

When you use the basic su command, you change accounts but do not completely change your environment. To be specific, only the $HOME, $SHELL, $USER, $LOGNAME, $PATH, and $IFS environment variables are reset. Depending on how su was compiled, $TERM, $COLORTERM, $DISPLAY, and $XAUTHORITY may also be reset.
These limitations make switching accounts quicker and reduce your vulnerability if you are moving to the root account. However, they can create other difficulties. For example, because you will still be in your home directory, you will be unable to run scripts written for use in root. Entering su root will only change the account, and not the environment.
The same problem also exists with other accounts, and you can solve it by entering:
su ‑ [USER NAME]
The ‑l or ‑‑login options have the same function.
The options ‑m, ‑p, or ‑‑preserve‑environment will keep your original environment. You can also specify the shell to use when you switch accounts with ‑s or ‑‑shell [SHELL] (e.g., if want to see whether a script written for Bash will run in an alternative shell such as Zsh).
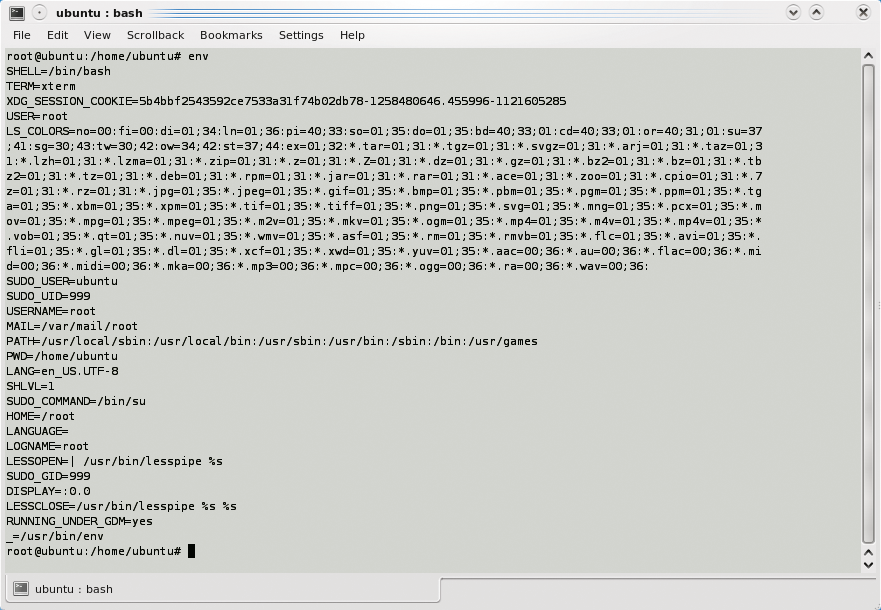
All this tinkering with environments can be confusing, which is why many users stay with su ‑. However, this is the least safe alternative: you are better off running the env command if you become confused. The long output that env provides contains entries, such as the home directory, that will show just what environment you are using (Figure 2).
Many users enter su ‑, change to root, and then enter a command. This habit is methodical, but it also increases the amount of time your system is vulnerable. A more efficient way is to use the ‑c option.
For example, some files are readable only as root. If you try to view them from an ordinary account, you simply get an error message. Instead of changing to root to read them, you can enter su ‑c "less /var/log/messages". The system responds by displaying the file in the less viewer. When you press the q key to quit the viewer, you return immediately to the original account, having spent the minimal time possible as root.
Quotation marks mean the command should be read as a continuous option of the su ‑c command. Without the quotation marks, su recognizes that less is a command but, expecting its usual syntax, wrongly interprets the file path as a username (Figure 3).

The Sudo Command
sudo is short for “switch user, do.” Functionally, it is roughly the equivalent of su ‑c, designed to run a single command as root and then return to the original account. However, whereas su requires the root password, sudo can be configured several ways, depending on how a particular distribution decides it is most secure.
Some Linux distributions, such as Ubuntu, let users enter their own passwords to use sudo. This practice lets a user perform privileged operations without the root password. On the other hand, you control which tasks the user can perform, and letting users authenticate with their own password minimizes the number of users who need access to the root password. Other distributions, such as openSUSE, require users to enter the root password with sudo.
Most users know sudo as the equivalent of the children’s magic word “please.” That is, to run a command with root privileges, you add sudo at the start. For example, to run the shutdown command to stop the system, you would type sudo shutdown and enter the appropriate password (typically your password or the root password, depending on your sudo configuration).
Your expanded privileges can be set to last for a time after you enter the first command – typically, five minutes. Until they expire, you can enter additional commands prefaced by sudo without entering a password again. You can extend this time by another 15 minutes using the ‑v option. Conversely, if you do not need the additional time, run sudo ‑K to remove your privileges. Less drastically, sudo ‑k [COMMAND] removes your current privilege for a specific command you are authorized to run with sudo. To restore the privileges, you need to run sudo again.
As with su ‑, sudo offers some control over the environment in which it runs. Using the ‑U option with sudo, you can run a command as a user other than root. You can also use ‑E to run commands in your current environment or ‑H to run them from your current home directory.
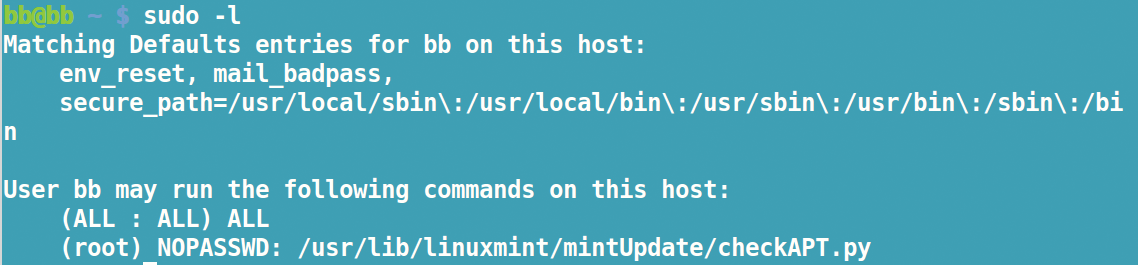
If you have trouble running sudo, start by running sudo ‑l (Figure 4). This command shows the paths to commands that you can run from the current account, as well as the set of commands themselves. In Ubuntu-derived distros, you are probably authorized to run all commands as root, but on a custom configuration, your choices may be more limited. Note that if you do not see a list, but are only offered three attempts to log in, then sudo is not configured on your system.
sudoers
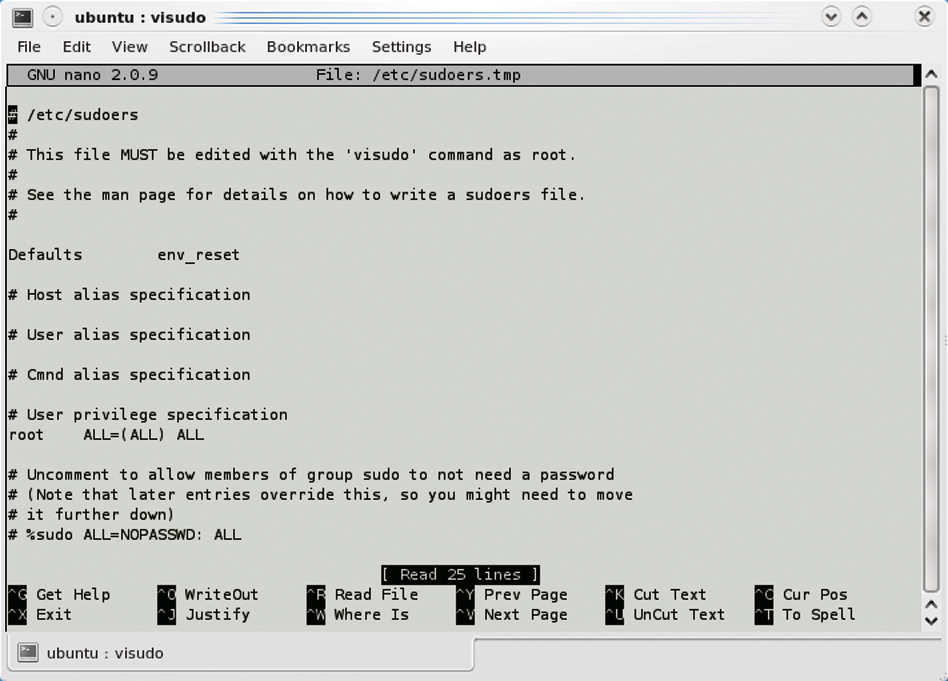
The /etc/sudoers file contains information on which users can use sudo and for what purposes. The sudoers file is a plain-text file, but you should never open it directly from a text editor. Instead, run either the command sudo ‑e sudoedit or the command visudo /etc/sudoers. Both commands lock the original file and open a temporary copy of sudoers in the default text editor (Figure 5). If you prefer, you can replace the default editor by running EDITOR=[EDITOR] /user/sbin/visudo. When you are finished, visudo checks for errors, giving you the chance to correct them or go ahead and save to the original file. Be careful before you save – syntactical errors can prevent sudo from working properly, or even at all.
The top of the sudoers file sets aliases for advanced configuration. Aliases can be used for such purposes as creating comma-separated lists of users or commands to simplify configuration. For example, if you want to restrict who can power off the system or network, add the following line to create the command alias SHUTDOWN:
Cmnd_Alias SHUTDOWN = /sbin/halt, /sbin/shutdown, /sbin/reboot, /sbin/poweroff
Once the alias is defined, you can give users the right to run all three commands simply by referencing the SHUTDOWN alias. In the same way, you could define a group of users called ADMINS, all of whom can run the same commands.
Regardless of whether you specify aliases, you can assign privileges with single-line entries. Depending on the distribution, the assignment of various privileges may be organized by commented lines prefaced with the hash (#) symbol. Be sure that the lines that assign privilege are below the list of uncommented aliases.
The simplest form of privilege assignment is [NAME] ALL=ALL. For example, bb ALL=ALL allows user bb to run any command from any terminal.
More restrictively, the line could read as follows:
bb /sbin/halt, /sbin/shutdown, /sbin/reboot, /sbin/poweroff=ALL
Or, if the SHUTDOWN alias suggested above was defined at the top of the sudoers file, the line could be:
bb SHUTDOWN=ALL
The sudoers file can also contain fields to adjust other behaviors. The most useful fields are passwd_tries, which sets the number of attempts to log in to sudo; passwd_timeout, which sets the length of time that a login lasts; and editor, which sets the editors you can use with sudo. For a complete list of these fields, see the sudoers man page.
Avoiding Self-Sabotage
Like much of Linux, su and sudo can be as simple or as complex as you choose. Most popular uses of sudo, in particular, are extremely basic, and by copying them, you can quickly get up to speed. However, when you use su and sudo, be careful that you do not undermine their purpose. The entire point of both commands is to increase security by minimizing the time you run as root. Both commands can reduce your time as root to the bare minimum, but that doesn’t mean you can relax other precautions.
Specifically, avoid using su to become root and then keeping a terminal open and forgotten on some overlooked virtual workspace. Similarly, reduce the time that a successful sudo login lasts to the minimum. Consult system logs to ensure that the powerful su and sudo commands are only used for authorized activities. (Also see the box titled “The Administrator Sees Everything.”)
| The Administrator Sees Everything |
|---|
|
The system will log unsuccessful calls to su and sudo. If you type su and enter the wrong password, an entry like the following will appear in the logfile (messages, syslog, or auth.log below the /var/log/ directory): Nov 23 08:14:08 server su: FAILED SU (to root) esser on /dev/pts/3 Unsuccessful calls to sudo are also logged. Typically, you will see entries in the /var/log/messages file, although Fedora Linux writes the entries to /var/log/secure and only logs the errors in messages: Sep 11 21:10:47 huhnix sudo: huhn : TTY=pts/6 ; PWD=/home/huhn ; USER=root ; COMMAND=/usr/bin/less /var/log/messages The sudo command differs from su in that the logfile also reveals which program a user ran with root privileges, but that’s not all. If you attempt to run a program without having the necessary privileges, don’t be surprised if the administrator knows exactly what you have been up to and sends you a friendly reminder about unsuccessful “break-in attempts.” Users also learn that they are not allowed to run sudo thanks to a console message: $ sudo less /var/log/messages Password: peggy is not in the sudoers file. This incident will be reported. In plain English, this message means that the root user will receive a message by email that shows exactly when “peggy” failed to run sudo: The message is tagged as “SECURITY information for huhnix.” If you want to find out which commands you are allowed to run under sudo, you can type sudo ‑l for a list of commands allowed through the sudo configuration. |
This article originally appeared in the Linux Shell Handbook and is reprinted here with permission.
Want to read more? Check out the latest edition of Linux Shell Handbook.
See also:
6 Steps to Teach Yourself System Administration
Certifications to Boost Your Open Source Career
How to Detect Hidden Processes in Linux
What is a System Administrator?


Comments