
Linux and other Unix-like systems use the concept of a user account, which allows the system to manage identities and restrict access to a collection of resources associated with a specific person or the groups to which that person belongs. One aspect of a user account is the familiar login prompt that often greets users who want to access a computer. The user’s identity is also a means for assigning access permissions to files, directories, and other resources.
Linux also lets the system administrator manage access to resources through group membership. A group is a collection of users, typically with a common purpose and, therefore, a common need for access to a collective set of resources. For example, a group called accounting might contain users who are part of the accounting team with the need for a common level of access to spreadsheets and other financial data. Rather than manually giving each user permissions for every file, the administrator can assign access permissions to the accounting group and then place users in the group to give them access to the files.
To see which groups you belong to, you can use the command groups from the command line.
If more than one user accesses your computer, it is a good idea to create an account for each person. The most common command-line utilities used to create new users and groups are useradd and groupadd. These utilities live in /usr/sbin by default, and to use them, you need to be the superuser.
Privileges
For every file and directory, Linux defines which users may read, write, and execute that file. Also, every file belongs to an owner (an individual user) and to a group. To see the owners, group owners, and permissions for each file and directory in your current directory, type
$ ls ‑l
into your terminal window (Figure 1); the -l option enables long mode.
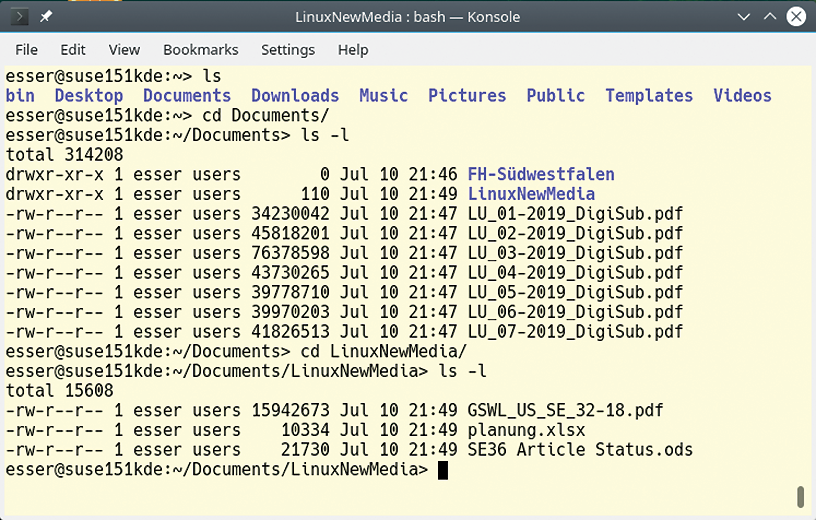
ls ‑l command shows files’ permissions.
The first column on the left shows the permissions, which I will explain shortly; the second column indicates the number of “hard links” to the file or directory (that is the number of filenames under which you can find a file); the third column shows the owner; the fourth column shows the group; and the fifth column shows the file size. Finally, you have the date and time at which the file or directory was last modified and its name.
If you look at the first column, the following three permissions are assigned separately for owners, groups, and other users:
- Read permission (
rflag): Users can display the contents of a file or folder on screen, copy the file, and do a few other things. Directories should additionally have thexflag (see below) to allow users to change to that folder; otherwise, only a list of files can be displayed. - Write permission (
wflag): Users can change files and directories and store their changes. Note that you need write permission for a folder to delete files inside that folder; write permission for the file is not required for deleting it, though thermcommand will ask for confirmation when you try to delete a non-writable file. - Execute permission (
xflag): For programs, this means the user is permitted to run the program. Execute permission for a directory means the user is permitted to change to the directory (the user additionally needs read permission to be able to view the folder content).
As you can see, permissions are indicated by the letters r (for read), w (for write), and x (for execute). In the ls output, note the three sets of r, w, and x (with some letters possibly replaced with “‑”) at the beginning of the file entry. The first block shows the permissions for the owner, the second block refers to the group, and the third block refers to all other users. Folders are indicated by a d (for “directory”) and regular files by a single dash (‑) at the start of the line. A number of other types of entries exist, such as symlinks (l), block devices (b), and character devices (c), but I will not go into them here.
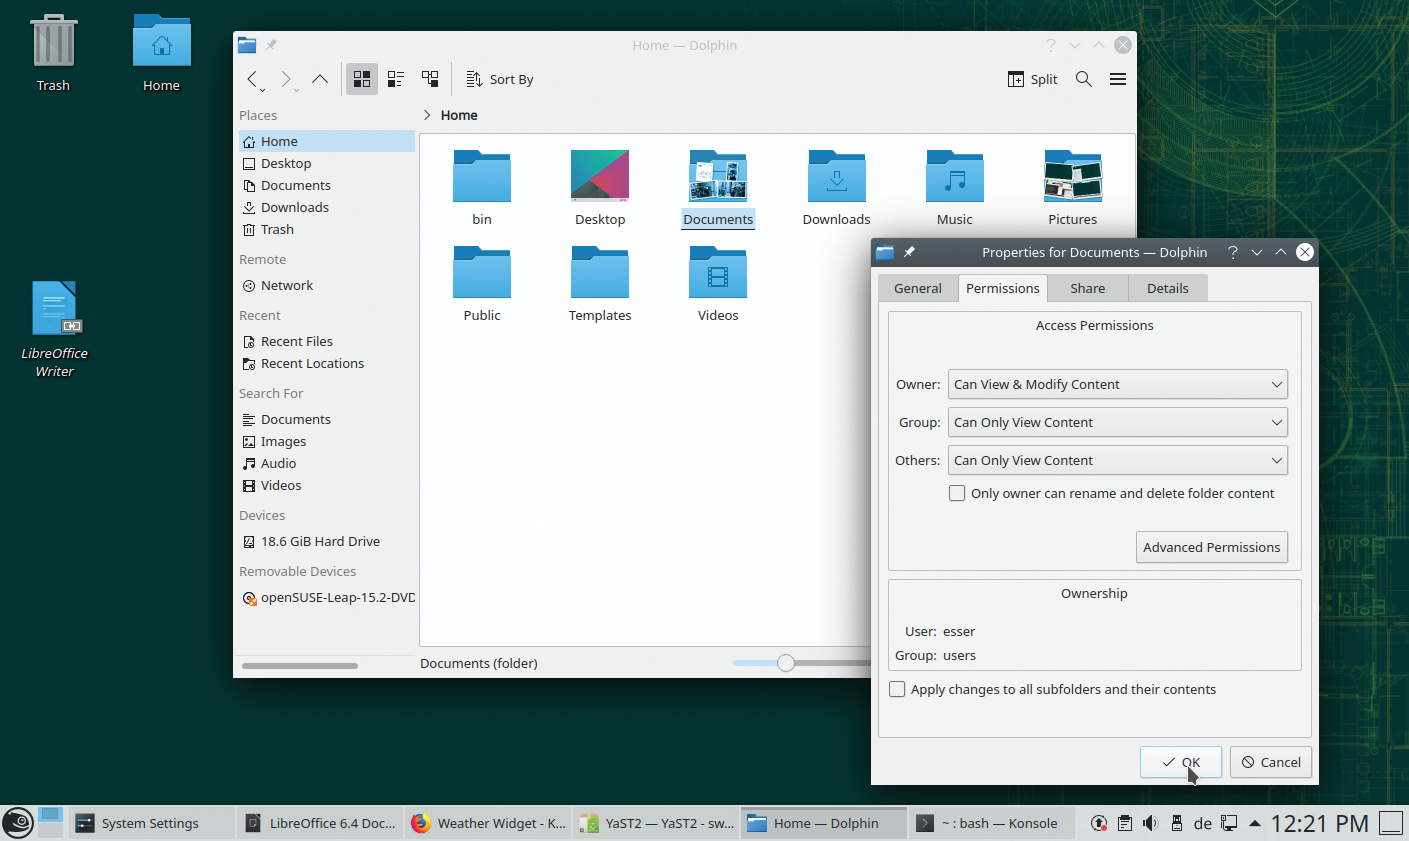
You’ll see a different version of this permission information when you right-click on a file in the Dolphin file manager, choose Properties, and then select the Permissions tab (Figure 2).
The chmod program lets you modify file and directory permissions, assuming you are the owner or the system administrator, using either letters or numbers. Here, I’ll concentrate on using letters, because they’re easier to remember.
Using letter notation, u stands for user (owner), g for group, and o for others (all other users). I described previously the meanings for r, w, and x. A combination of these letters (without spaces!) with plus, minus, and equals signs tells chmod to add, remove, or assign these permissions (Table 1). To give the group read and write permissions for a file, type chmod g+rw <file>.
Removing permissions follows the same pattern: The chmod o‑rwx <file> command removes all permissions for all users who are neither the owner nor members in the owner group. You could combine these two commands:
$ chmod g+rw,o‑rwx <file_name>
As I mentioned before, an equals sign lets you assign precisely the permissions specified at the command line. For example, the command
$ chmod ugo=rwx <directory_name>
gives the owner, group members, and all other users read, write, and execute permissions for the directory. Instead of ugo, you could alternatively use a (for “all”) to assign user, group, and other permissions.
To change group membership for files and directories, you can use the chgrp tool. Keep in mind that Linux takes extra precautions with this command: As a “normal” user, you can assign your own files to groups as long as you are a member of the group. As already stated, to see the groups you belong to, you can type groups into a terminal window:
$ groups
editors adm dialout cdrom sudo audio video
plugdev games users netdev input indiecity
In this case, the user may change access to their own files for members of the groups editors, adm, dialout, cdrom, sudo, audio, and so on. The chgrp command first expects the name of the new group and then the name of the file or directory. To assign a file to the audio group, just type:
$ chgrp audio <file_name>
On a Linux system, the system administrator is allowed to assign new owners and new groups to files and directories. To give a file to user phil, simply use the chown command:
# chown phil <file_name>
Also, you can assign the file to a new group in the same command. To do so, add the name of the group after a colon:
# chown phil:audio <file_name>
The file now belongs to user phil and group audio (see the “Rights of Ownership” box).
| Rights of Ownership |
|---|
The chown utility is primarily for the root user, but a “normal” user may use the tool in some situations. For example, chown phil:audio file_name changes the group membership of the file. The user phil is allowed to use this command if the user is a member of the group audio and owns the named file. |
All three tools – chmod, chgrp, and chown – support the ‑R option for recursive actions. If you want members of the video group to access a directory and the files it contains, just type:
# chgrp ‑R video <directory>
The ‑R option can also save you some typing in combination with the chmod command. To remove read, write, and execute permissions from this folder for all users who are not the owner or members of the video group, type:
$ chmod ‑R o‑rwx <directory>
Be careful when you run recursive commands that remove the execute flag. If you mistakenly type a‑x instead of o‑x, you will lock yourself out: chmod will remove execute permissions from the parent directory and your ability to make changes to the directory or modify the files (Listing 1).
Listing 1: Oops … Locked Out!
$ ls ‑l test
total 0
‑rwxr‑xr‑x 1 audio audio 0 Nov 4 12:12 bar
‑rwxr‑xr‑x 1 audio audio 0 Nov 4 12:12 foo
$ chmod ‑R a‑x test
chmod: cannot access 'test/bar': Permission denied
chmod: cannot access 'test/foo': Permission denied
Using the find command can help you avoid this kind of dilemma (Listing 2). The find command in Listing 2 first discovers files (‑type f) in the test directory (and possible subfolders) and then runs chmod on them, ignoring the directory itself.
Listing 2: Using the find Command
$ find test ‑type f ‑exec chmod a‑x \{\} +
$ ls ‑l test
total 0
‑rw‑r‑‑r‑‑ 1 audio audio 0 Nov 4 12:12 bar
‑rw‑r‑‑r‑‑ 1 audio audio 0 Nov 4 12:12 foo
Conclusion
We hope this brief introduction helps you understand basic concepts you’ll need to work with Linux user accounts, privileges, and file permissions.
This article is excerpted from Getting Started with Linux and is reprinted here with permission.
Want to read more? Check out the latest edition of Getting Started with Linux.


Comments